> ## Documentation Index
> Fetch the complete documentation index at: https://lightdash-refactor-full-audit-reorg.mintlify.site/llms.txt
> Use this file to discover all available pages before exploring further.
# Create your first project
> Install the Lightdash CLI, generate your first Tables from your dbt models, and create your project.
 In Lightdash, everything you need for BI is written as code in your dbt project. You use dbt to transform all of the data from your data warehouse, then you use Lightdash to explore it.
But, before you hook up your dbt project to Lightdash, we need to make sure we have Tables to explore. **In this setup guide, we'll walk you through the steps of installing + using the Lightdash CLI and creating the first Tables in your project.**
**New to dbt?** If you haven't used dbt before, [follow dbt's getting started guide](https://docs.getdbt.com/tutorial/setting-up) before proceeding with setting up Lightdash.
## What are Tables?
Tables are the starting point for any data exploration in Lightdash — they're the data you can query. Lightdash stays in sync with your dbt project, so Tables come from the dbt models defined in your project's YAML files. If a dbt model has a YAML definition, it shows up in Lightdash as a Table.
Not sure what a YAML file is? [Check out dbt's docs on model properties](https://docs.getdbt.com/reference/model-properties) to learn about adding YAML files for your dbt models.
### Choose which models become Tables
`lightdash dbt run` documents every column in your models as a dimension and generates a Table for each one. It supports [dbt's model selection syntax](https://docs.getdbt.com/reference/node-selection/syntax), so you can generate Tables for your whole project at once or narrow to a subset — for example, everything tagged `lightdash`:
```bash theme={null}
lightdash dbt run # every model with a YAML definition
lightdash dbt run -s tag:lightdash # all models with the lightdash tag
lightdash dbt run -s payments # just payments
lightdash dbt run -s payments+ # payments and all children
lightdash dbt run -s +payments # payments and all parents
lightdash dbt run -s payments+ +customers tag:lightdash # mix and match
```
Now that you know what Tables are, let's install the CLI and create your first project.
***
## Step 1: Install the Lightdash CLI tool
The Lightdash CLI is the recommended way to develop your dbt + Lightdash project. It makes development faster and easier, as well as giving you options for building more powerful automation to manage your Lightdash instance.
Before installing Lightdash CLI, you need to have NodeJS/NPM installed on your machine. To check that, run the following command in your terminal:
```bash theme={null}
node -v; npm -v;
# it should print something like:
# v20.8.0
# 8.15.0
```
We recommend installing NodeJS/NPM using [NVM (Node Version Manager)](https://github.com/nvm-sh/nvm#install--update-script) which works for POSIX-compliant shells (sh, dash, ksh, zsh, bash on these platforms: unix, macOS, and windows WSL)
Open your terminal and run the command below to install NVM (Node Version Manager) to your system.
```bash theme={null}
curl -o- https://raw.githubusercontent.com/nvm-sh/nvm/v0.39.2/install.sh | bash
# or
wget -qO- https://raw.githubusercontent.com/nvm-sh/nvm/v0.39.2/install.sh | bash
```
Restart terminal and install NodeJS by running
```bash theme={null}
nvm install --lts
```
Check that NodeJS is installed by running
```bash theme={null}
node -v
```
Running the command above should output something like `20.8.0` which means you've succesfully installed NodeJS/NPM
***
Alternatively, you can [install NodeJS/NPM via your preferred package manager](https://nodejs.org/en/download/package-manager).
Run the following on your terminal to install the Lightdash CLI.
```bash theme={null}
npm install -g @lightdash/cli
```
If you get an `npm ERR! code EACCES` error while installing the Lightdash CLI, [follow this guide](https://docs.npmjs.com/resolving-eacces-permissions-errors-when-installing-packages-globally) to resolve it.
***
## Step 2: Login to the CLI[](#step-2-login-to-the-cli "Direct link to Step 2: Login to the CLI")
We've automatically generated a personal access token that you can use to login to the CLI, so you just need to copy-paste that command in your Terminal.
It's Step 2. and should look something like this:
```bash theme={null}
lightdash login https://{{ lightdash_domain }} --token my-super-secret-token
```
Where `{{ lightdash_domain }}` is `app.lightdash.cloud` for Lightdash Cloud users. Or your own domain if self-hosting. If you want to login using another method, then you [can check out our authentication methods here](/workflow/cli/authenticate).
***
## Step 3: Add Tables[](#step-3-add-tables "Direct link to Step 3: Add Tables")
If you're using dbt Cloud, you'll need to [clone your repo to your local machine](https://docs.github.com/en/repositories/creating-and-managing-repositories/cloning-a-repository) before completing the next steps.
To get our dbt project Lightdash-ready, we need to define all of the columns in our dbt models that we want to explore in Lightdash. We've made this really easy to do using our CLI tool and the command:
```bash theme={null}
lightdash dbt run
```
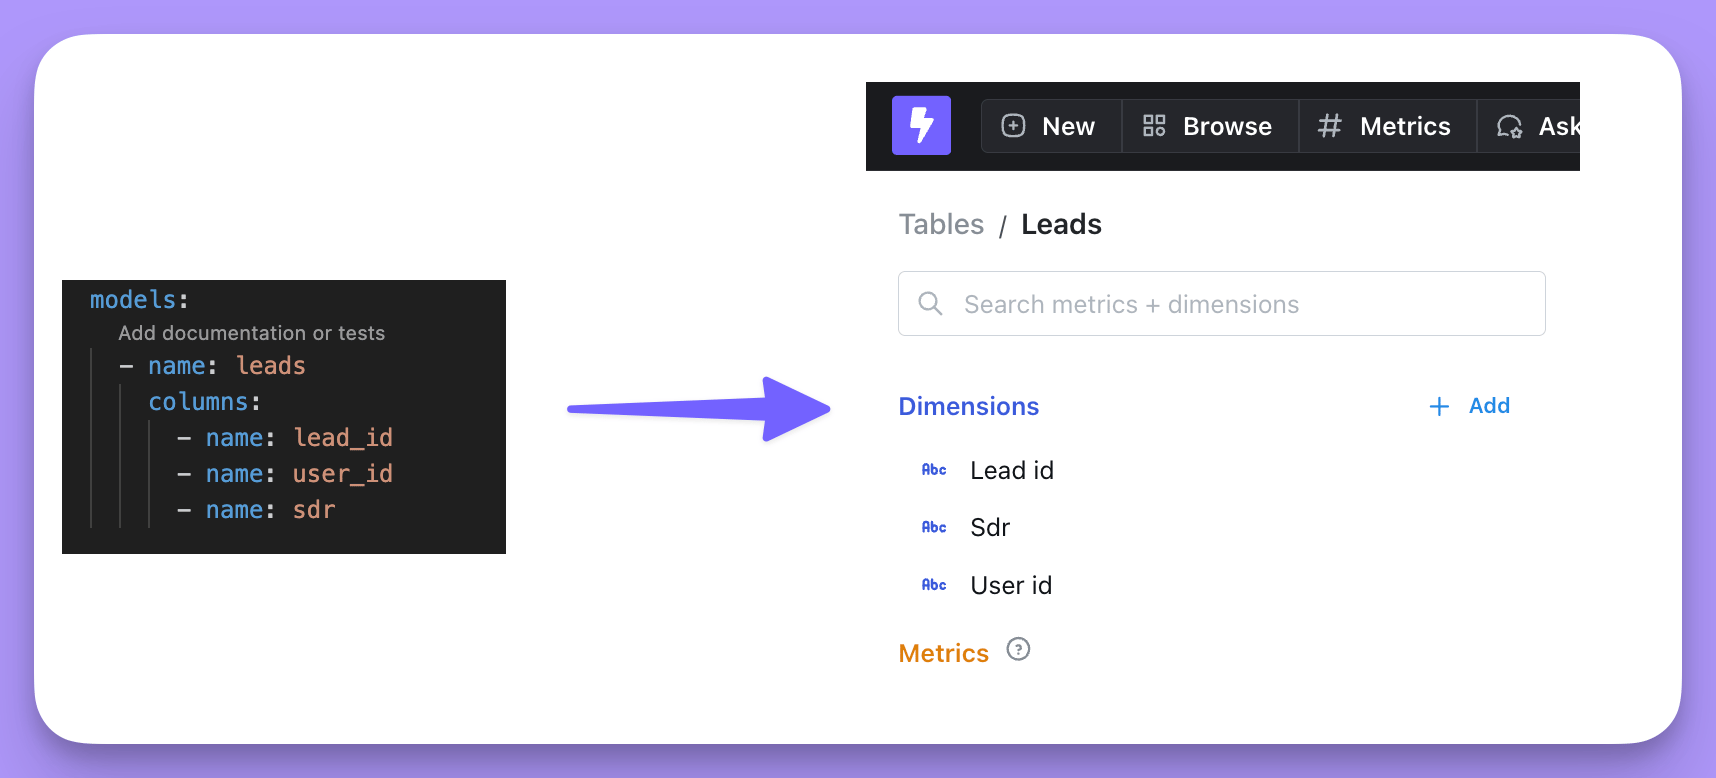
This will generate Tables and dimensions for your entire dbt project. It will document all of the columns in your models and these are what we explore in Lightdash as `Dimensions`.
For example, if we have a `leads.yml` file, we'd have a Table called `Leads` and it would have the dimensions: `Lead id`, `User id`, and `sdr`.
In Lightdash, everything you need for BI is written as code in your dbt project. You use dbt to transform all of the data from your data warehouse, then you use Lightdash to explore it.
But, before you hook up your dbt project to Lightdash, we need to make sure we have Tables to explore. **In this setup guide, we'll walk you through the steps of installing + using the Lightdash CLI and creating the first Tables in your project.**
**New to dbt?** If you haven't used dbt before, [follow dbt's getting started guide](https://docs.getdbt.com/tutorial/setting-up) before proceeding with setting up Lightdash.
## What are Tables?
Tables are the starting point for any data exploration in Lightdash — they're the data you can query. Lightdash stays in sync with your dbt project, so Tables come from the dbt models defined in your project's YAML files. If a dbt model has a YAML definition, it shows up in Lightdash as a Table.
Not sure what a YAML file is? [Check out dbt's docs on model properties](https://docs.getdbt.com/reference/model-properties) to learn about adding YAML files for your dbt models.
### Choose which models become Tables
`lightdash dbt run` documents every column in your models as a dimension and generates a Table for each one. It supports [dbt's model selection syntax](https://docs.getdbt.com/reference/node-selection/syntax), so you can generate Tables for your whole project at once or narrow to a subset — for example, everything tagged `lightdash`:
```bash theme={null}
lightdash dbt run # every model with a YAML definition
lightdash dbt run -s tag:lightdash # all models with the lightdash tag
lightdash dbt run -s payments # just payments
lightdash dbt run -s payments+ # payments and all children
lightdash dbt run -s +payments # payments and all parents
lightdash dbt run -s payments+ +customers tag:lightdash # mix and match
```
Now that you know what Tables are, let's install the CLI and create your first project.
***
## Step 1: Install the Lightdash CLI tool
The Lightdash CLI is the recommended way to develop your dbt + Lightdash project. It makes development faster and easier, as well as giving you options for building more powerful automation to manage your Lightdash instance.
Before installing Lightdash CLI, you need to have NodeJS/NPM installed on your machine. To check that, run the following command in your terminal:
```bash theme={null}
node -v; npm -v;
# it should print something like:
# v20.8.0
# 8.15.0
```
We recommend installing NodeJS/NPM using [NVM (Node Version Manager)](https://github.com/nvm-sh/nvm#install--update-script) which works for POSIX-compliant shells (sh, dash, ksh, zsh, bash on these platforms: unix, macOS, and windows WSL)
Open your terminal and run the command below to install NVM (Node Version Manager) to your system.
```bash theme={null}
curl -o- https://raw.githubusercontent.com/nvm-sh/nvm/v0.39.2/install.sh | bash
# or
wget -qO- https://raw.githubusercontent.com/nvm-sh/nvm/v0.39.2/install.sh | bash
```
Restart terminal and install NodeJS by running
```bash theme={null}
nvm install --lts
```
Check that NodeJS is installed by running
```bash theme={null}
node -v
```
Running the command above should output something like `20.8.0` which means you've succesfully installed NodeJS/NPM
***
Alternatively, you can [install NodeJS/NPM via your preferred package manager](https://nodejs.org/en/download/package-manager).
Run the following on your terminal to install the Lightdash CLI.
```bash theme={null}
npm install -g @lightdash/cli
```
If you get an `npm ERR! code EACCES` error while installing the Lightdash CLI, [follow this guide](https://docs.npmjs.com/resolving-eacces-permissions-errors-when-installing-packages-globally) to resolve it.
***
## Step 2: Login to the CLI[](#step-2-login-to-the-cli "Direct link to Step 2: Login to the CLI")
We've automatically generated a personal access token that you can use to login to the CLI, so you just need to copy-paste that command in your Terminal.
It's Step 2. and should look something like this:
```bash theme={null}
lightdash login https://{{ lightdash_domain }} --token my-super-secret-token
```
Where `{{ lightdash_domain }}` is `app.lightdash.cloud` for Lightdash Cloud users. Or your own domain if self-hosting. If you want to login using another method, then you [can check out our authentication methods here](/workflow/cli/authenticate).
***
## Step 3: Add Tables[](#step-3-add-tables "Direct link to Step 3: Add Tables")
If you're using dbt Cloud, you'll need to [clone your repo to your local machine](https://docs.github.com/en/repositories/creating-and-managing-repositories/cloning-a-repository) before completing the next steps.
To get our dbt project Lightdash-ready, we need to define all of the columns in our dbt models that we want to explore in Lightdash. We've made this really easy to do using our CLI tool and the command:
```bash theme={null}
lightdash dbt run
```
This will generate Tables and dimensions for your entire dbt project. It will document all of the columns in your models and these are what we explore in Lightdash as `Dimensions`.
For example, if we have a `leads.yml` file, we'd have a Table called `Leads` and it would have the dimensions: `Lead id`, `User id`, and `sdr`.
 If you're getting an error: `Error: Not a dbt project (or any of the parent directories). Missing dbt\_project.yml file`
Make sure that you're in your dbt project folder (i.e. where your `dbt_project.yml` file is) before you try doing `lightdash dbt run`
To generate Tables for only some of your models, use the [dbt selection syntax shown above](#choose-which-models-become-tables).
***
## Step 4: Create your project
Now, your dbt project is Lightdash-ready! Just run this command and follow the link to start exploring your data:
```bash theme={null}
lightdash deploy --create
```
***
## Next steps: Update your project connection settings
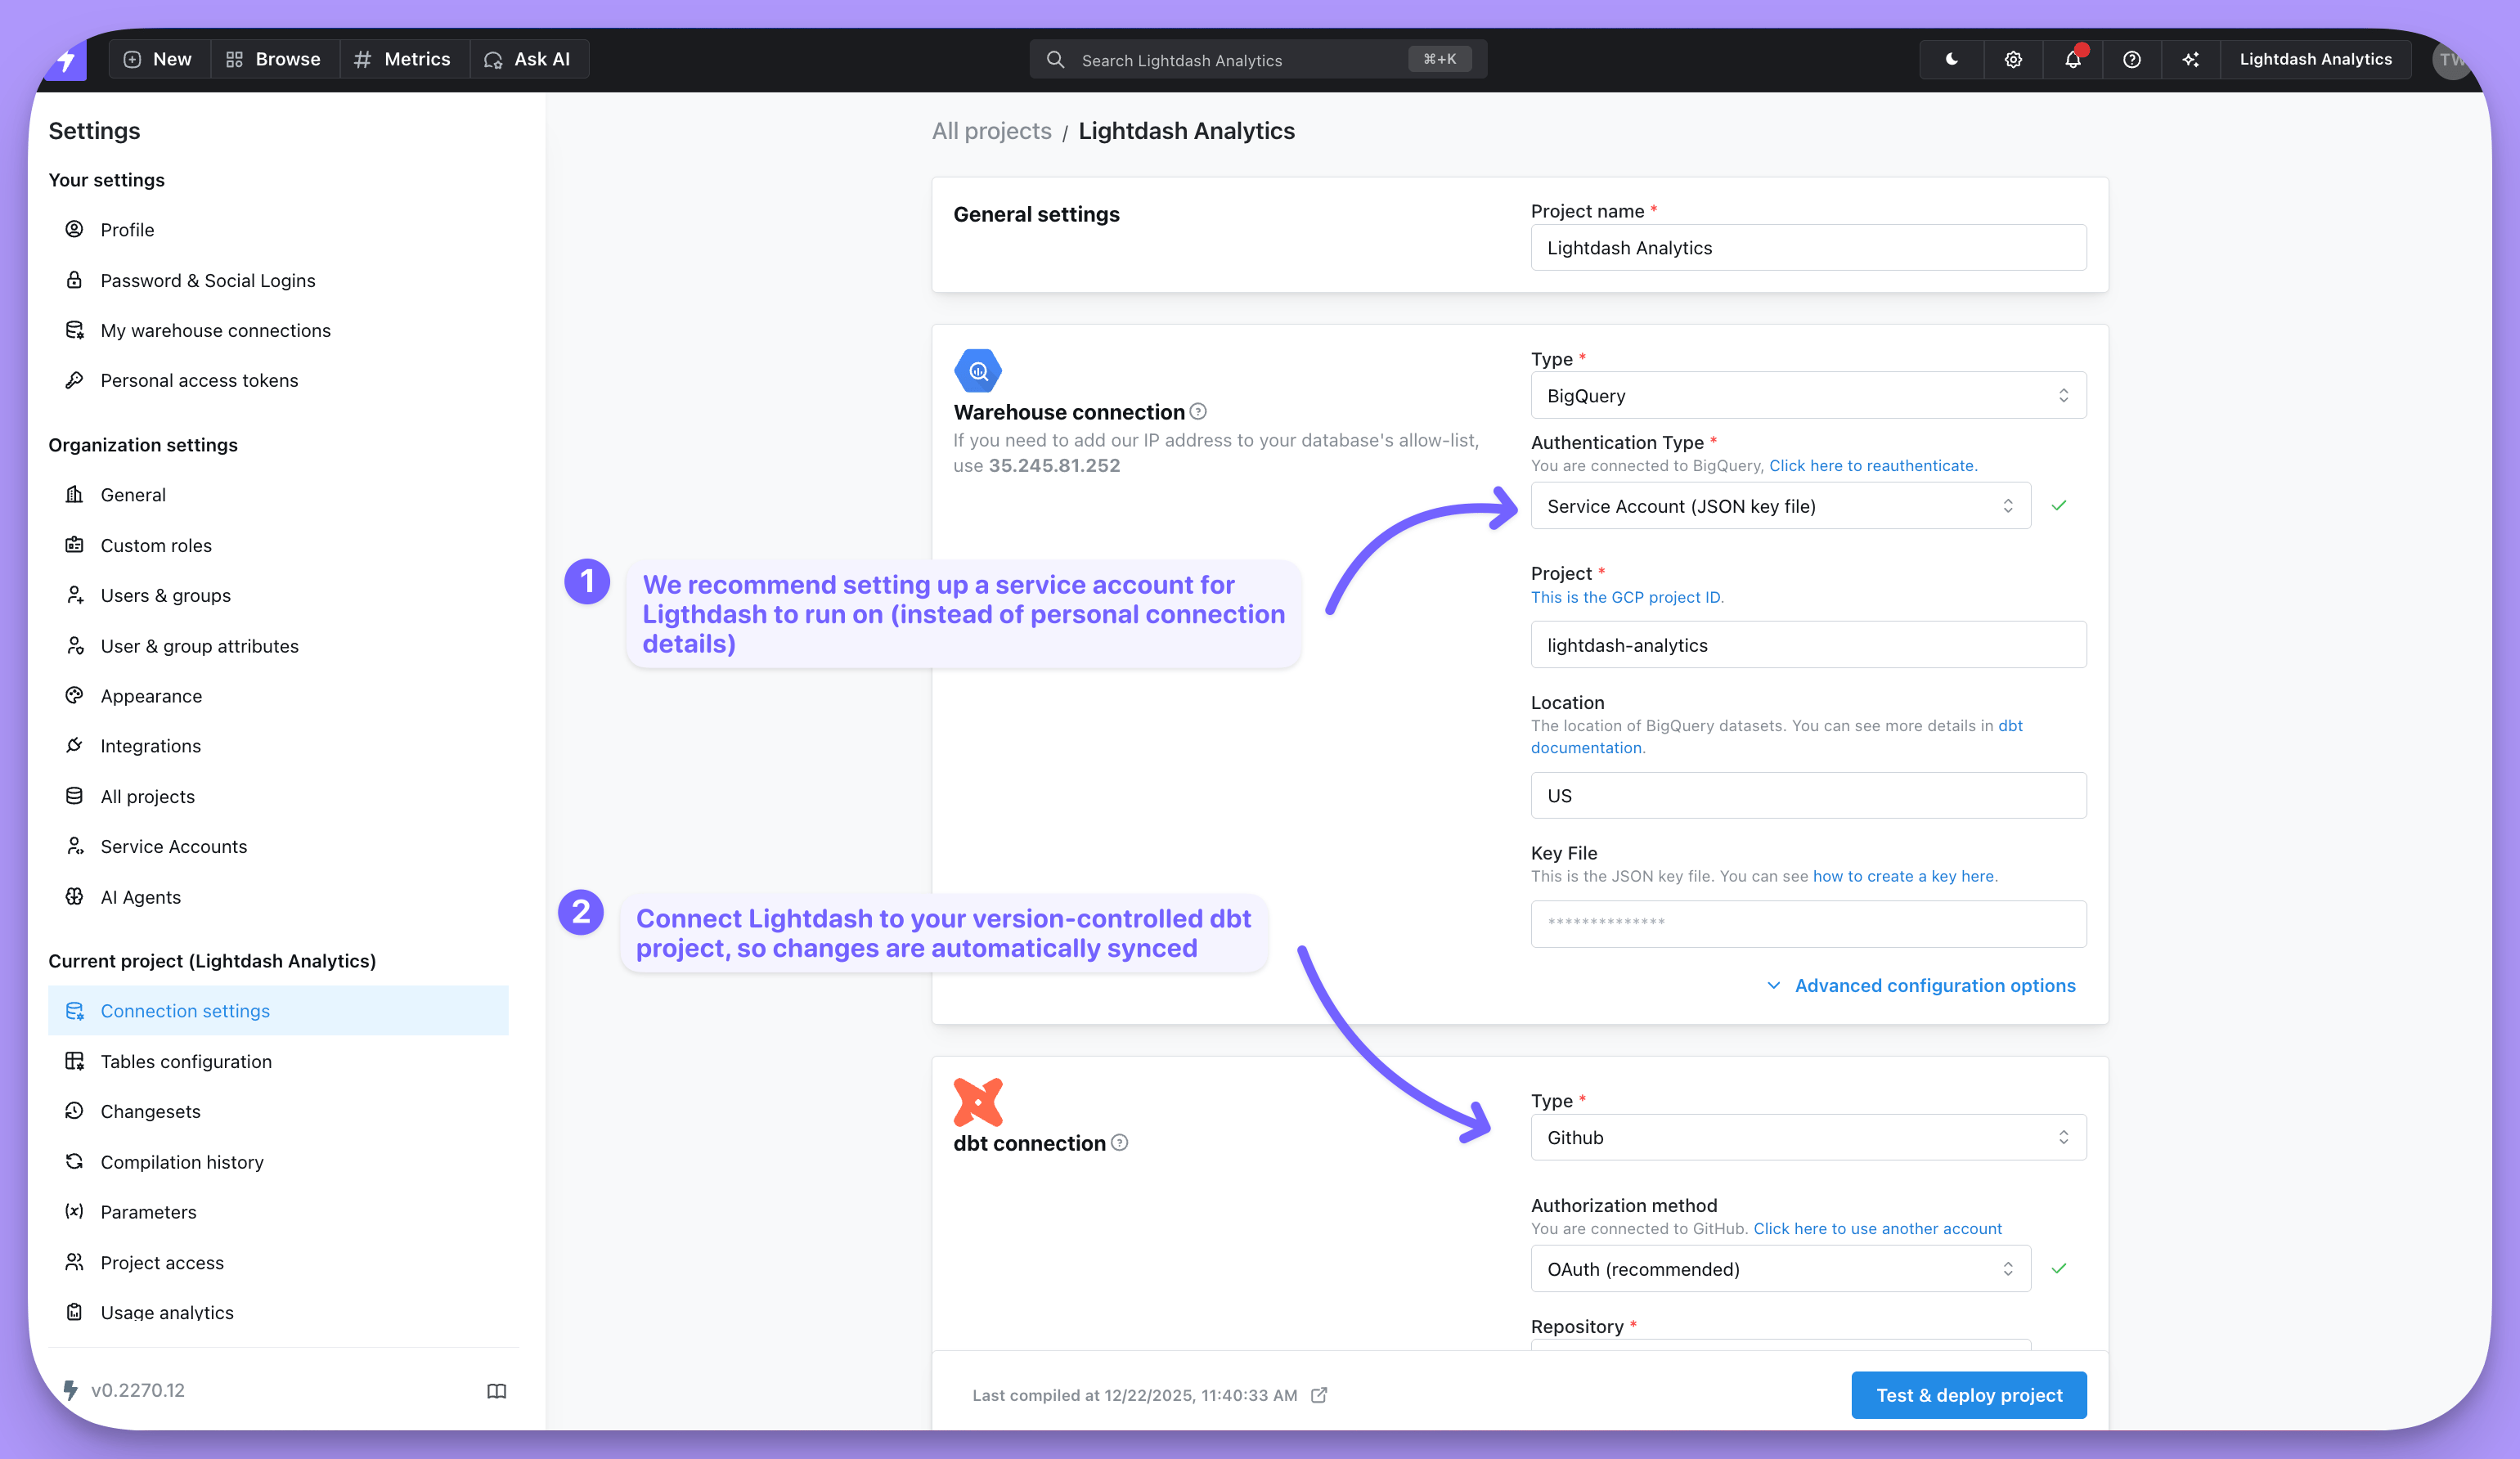
We create your first project using your local dbt `profiles.yml` file. So, you might want to update your connection settings to:
1. Set up a service account for Lightdash to run on (instead of using your personal connection details)
2. Connect Lightdash to your version controlled dbt project so changes are automatically synced.
Check out details on [updating your connection settings here](/get-started/quickstart/connect-project).
If you're getting an error: `Error: Not a dbt project (or any of the parent directories). Missing dbt\_project.yml file`
Make sure that you're in your dbt project folder (i.e. where your `dbt_project.yml` file is) before you try doing `lightdash dbt run`
To generate Tables for only some of your models, use the [dbt selection syntax shown above](#choose-which-models-become-tables).
***
## Step 4: Create your project
Now, your dbt project is Lightdash-ready! Just run this command and follow the link to start exploring your data:
```bash theme={null}
lightdash deploy --create
```
***
## Next steps: Update your project connection settings
We create your first project using your local dbt `profiles.yml` file. So, you might want to update your connection settings to:
1. Set up a service account for Lightdash to run on (instead of using your personal connection details)
2. Connect Lightdash to your version controlled dbt project so changes are automatically synced.
Check out details on [updating your connection settings here](/get-started/quickstart/connect-project).